TEST PRINCIPLE
Evaluation of the consistencies of two types of moisturizing creams by back extrusion.
BACKGROUND
Moisturizing creams serve to keep the skin feeling smooth, soft, and looking radiant and healthy by retaining moisture or water in the outer most skin layer. Different moisturizing creams will be defined by their viscosity or thickness. Formulating moisturizing creams therefore largely depends upon the required end product consistency, influencing the choice of material to use.
One desirable factor in product development is having a product that easily squeezes out of a tube and breaks off cleanly after squeezing. With the use of forward and backward extrusion tests these consistencies can be assessed. The forward extrusion simulates the force required by the consumer to extrude the sample and the backward extrusion an indication of product structure failure and flow properties. The back extrusion accessory is useful for testing viscous products. Samples can also be tested in their containers directly from the production line.
METHOD
| Equipment: |
CT3 with 4.5 kg load cell |
|
Fixture Base Table (TA-BT-KIT) |
| |
Dual Extrusion Cell (TA-DEC) |
|
TexturePro CT Software |
Settings:
| Test Type: |
Compression |
| Pre-Test Speed: |
1.0 mm/s |
| Test Speed: |
2.0 mm/s |
| Post-Test Speed: |
2.0 mm/s |
| Target Type: |
Distance |
| Target Value: |
25 mm |
| Trigger Force: |
10 g |
Note: It is recommended that the pre-test speed be the same as or less than the test speed for accurate trigger detection; for example, 1 mm/s test speed will require ≤ 1 mm/s pre-test speed.
The target distance chosen should be such that the probe does not deform the sample to more than 75% of sample depth, otherwise the base effect may affect results.
PROCEDURE
- Attach the extrusion disc to the load cell.
- Fit the back extrusion cell onto the base table; tighten the screws, but still allow some degree of mobility.
- Align the extrusion container centrally below the extrusion disc (plunger), then tighten the screws of the base table.
- Remove the sample kept at a specific temperature from storage.
- Fill the extrusion container with the sample to about 75% full, minimizing air bubbles.
- Position the probe to a specified starting distance E.g., 10 mm above the top of the container or sample surface. This will ensure the probe returns to the same position after each test, enabling comparisons of adhesive force which is an indication of the cohesiveness of the sample.
RESULTS
A comparison of consistencies of two types of moisturizing creams by back extrusion.
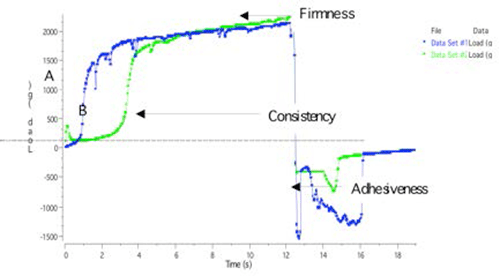
Figure I
The graph in Figure I shows the consistencies of two types of moisturizing creams stored and tested at 21°C in a 40 mm diameter back extrusion container.
Data Set #1: Sample A (Premium Moisturizing Cream)
Data Set #2: Sample B (Budget Moisturizing Cream)
OBSERVATIONS
When a 10 g surface trigger is attained, the plunger proceeds to push onto the sample to a depth of 25 mm. During this time, the sample is deformed and compressed to pack more tightly into the diminishing space available (under the descending plunger) and the force is seen to increase steadily. When the sample becomes more compact with limited air pockets, the force increases sharply and the extrusion commences. When the force increases to a maximum point, a plateau is observed indicating the force required to continue extrusion. This is the final load.
The maximum force on the graph measures firmness; the higher the value, the firmer the sample. The area under the positive part of the graph indicates sample consistency (work done to hardness1); the higher the value, the thicker and the higher the consistency of the sample.
As the probe returns to its starting position, the initial lifting of the weight of the sample on the upper surface of the disc produces the negative part of the graph resulting from back extrusion. This gives an indication of the adhesiveness/cohesiveness and resistance of the sample to separate (flow off) from the disc.
The maximum negative force on the graph indicates sample adhesive force; the more negative the value, the more “sticky” the sample. The area under the negative part of the graph is known as the adhesiveness (the energy required to break probe sample contact) and can give an indication of the cohesive forces of the molecules within the sample. The higher the value, the more energy required to break the probe sample contact as the probe withdraws from the sample.
From Figure I, sample A and B have similar maximum peak (firmness) values but Sample A has a higher consistency, seen by the larger area under the positive curve than sample B. Sample B shows a variation in consistency as seen by the initial steady increase in force over the first few seconds followed by a more rapid increase in force indicating the possibility of sedimentation in the sample and formation of two layers. Sample A has a higher adhesive component than sample B with a higher negative peak value.
The test can be used as a quality control tool to ensure consistency in production and also in R&D and Product Development in monitoring effect of formulation or process control changes. Tests obtained from 3 moisturizing creams of each formulation give the following mean hardness and work done values below:
|
Sample
|
Hardness
(g)
|
Hardness Work Done
(mJ)
|
|
A
|
2053.0 ± 23.7
|
398.8 ± 41.54
|
|
B
|
2262.8 ± 13.8
|
377.65 ± 16.32
|
>>Download a pdf of this application.